by Mike Donnelly
13 August 2019
We have been asked by several of our customers for instructions on creating “Live” (a.k.a. “tunable”) designs and embedding them in their own web-pages. These component manufactures appreciate the accessibility and customer-education value of these interactive reference designs, for demonstrating key features and effective usage of their devices, in the context to the customer’s application!
This article describes a method for creating this content. It is also product of that approach!
Create a Word Document
I started this web-article in a Word Document, where I created the desired structure and format of the content. I added and formatted the text, captions and tables:
Table 1 This is a table of parameter values
|
Circuit Element |
Value |
|
Resistor |
1k Ω |
|
Capacitor |
1uF |
|
Pulse |
4V |
I imported and re-sized images:

Figure 1: This is a 1k, 5% resistor
And included links to outside content: Link to PartQuest Explore Home Page
I just performed normal document editing functions. The only exception was I added the paragraph immediately below this one, which contained the words “iframe goes here”. That was so I would have specific text to search for in the HTML document, to indicate where the “Live” Design should be placed in a later step.
Once this document was complete, I saved it in the normal Word format (.docx). Then I saved it again in HTML format, using:
Save As -> Web Page, Filtered (.htm, .html)
Create a “Live” Design in PartQuest Explore
Next, I created the “Live” (tunable) design shown above, in PartQuest Explore. First, I should mention that you need to be authorized as a “Tunable Design Creator”, which is reserved for our Enterprise Subscribers. Once authorized, you can start defining which of the design’s parameters are “tunable” (i.e. can be changed by the end-user before he runs a new simulation), simply by clicking on the gear icon in the simulation toolbar, and switching from “Edit Design” mode to “Set Tunable Options” mode:

Next, I clicked on the vgen1 Voltage Function Generator and in the Property Editor, I clicked on the word “Fixed” above the Pulse Value entry line and chose “Tunable, no value restrictions”. The other options include “Fixed” (the default, not changeable), “Tunable list of values” (comma separated list) and “Tunable range of values” (any value within a specified range). These last two tunable options are demonstrated using the resistor the capacitor, respectively, in the RC tunable design above.
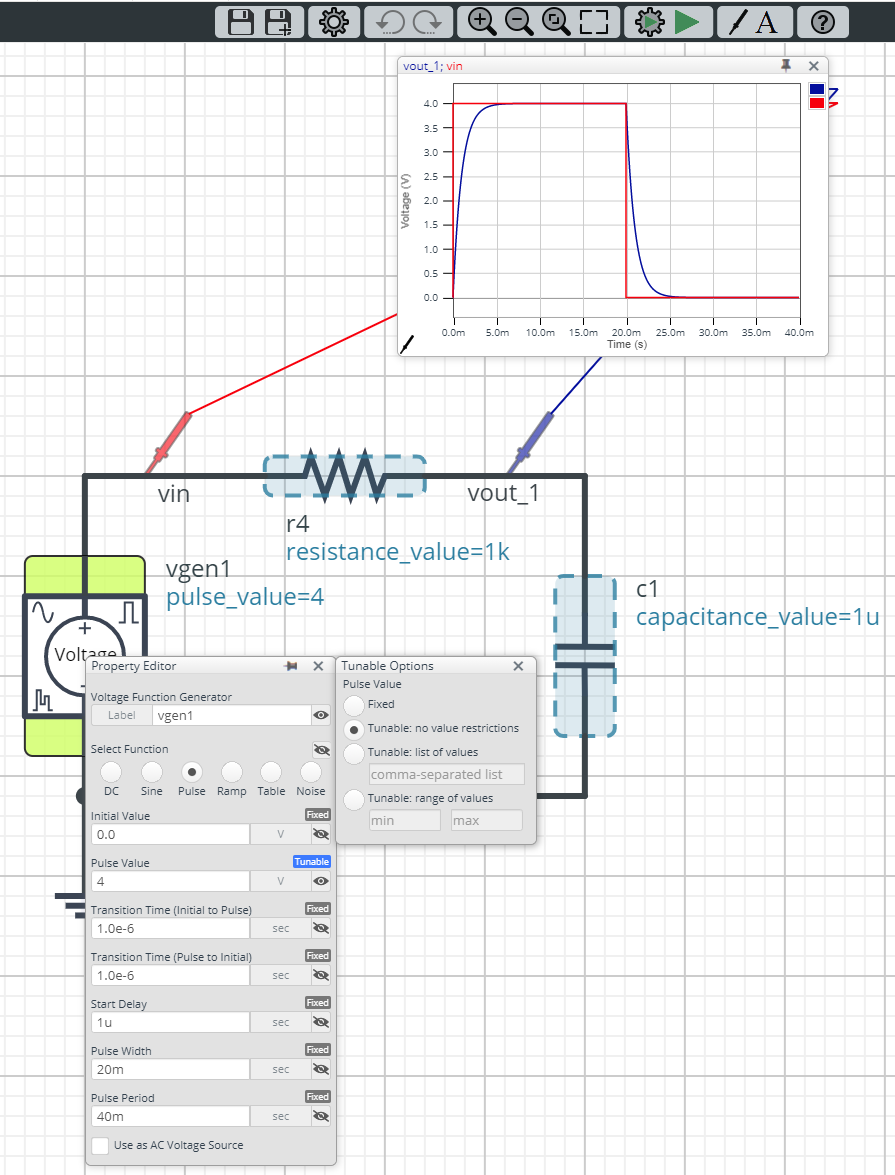
Finally, and this is a very important step, you must set the visibility of the design appropriately for the intended audience, by placing it in an appropriate “Group". If you wish to restrict the visibility to a specific set of colleagues who share membership with you in a specific Secret Group, then you can choose the name of that Group from your Groups List that will appear when you click into the entry form marked by the red rectangle. More likely, you want your tunable design to be seen and explored by the general public. In that case, you can just choose to place your design in your own public workspace (i.e. "YourUserName's Workspace"), as I did below. Alternatively, you can place it in any of your Public or Closed Groups.

Embedding the “Live” Design in the HTML Web-page
This last step is quite easy. On the right side sliding panel that has the Group name above, there is a share icon on the left edge. If you click on that icon a sharing window will appear. In the center section the iframe code used to embed this Live Design into your HTML document is displayed. This text can be simply copied and …

… Then pasted into the previously saved HTML form of your document. Just open that document in any HTML editor (any basic text editor), and replace the aforementioned “iframe goes here” text …

… with the text copied from PartQuest Explore:

That is all there is to it! You can save the updated HTML document in the basic text editor, and then when you open that HTML in a browser window it will look essentially the same as the Word document, but with your “Live” design ready for (inter)action!
Note: If you need to edit your document, you must go through the same steps in Word again, saving and both .docx and .html formats after making the edits, and then re-do the replace/copy/paste of the iframe text from PartQuest Explore into the .html file only.
- 316 views